3D HOLE ENLARGER MODEL 6980 |
||
 |
|
|
|
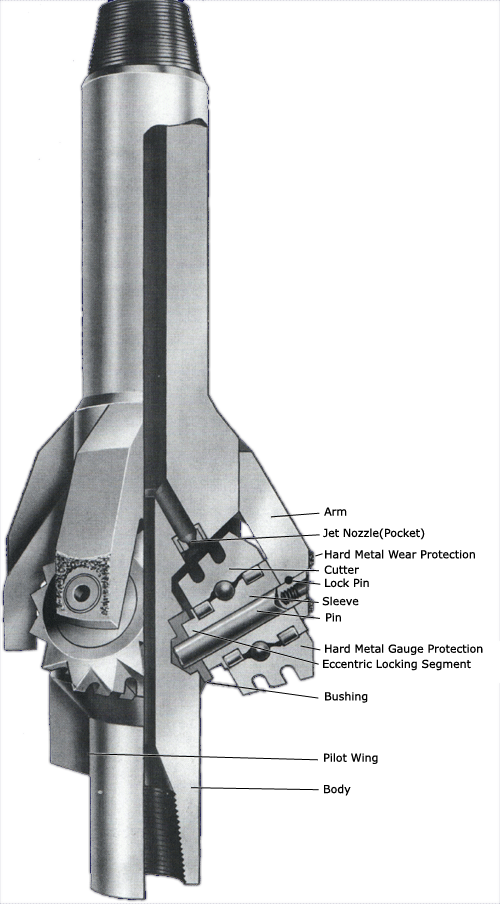
3D Hole enlargers open up previously drilled pilot and rat holes to larger diameters for casing running clearances and increased annular area for cementing; and for enlarging smaller holes due to coring and testing operations. There are 22 sizes to provide hole enlargements from 8 3/8 thru 36. Tough and rugged, the simple design has been proven over a period of years and built a reputation for faster penetration rates with longer downhole life. The tools are easily redressed on the rig floor, such as the need to change cutter types for newly encountered formations, without the need for cutting torches or welding equipment. |
||
| VERSATILE CUTTER ASSEMBLIES | |
|
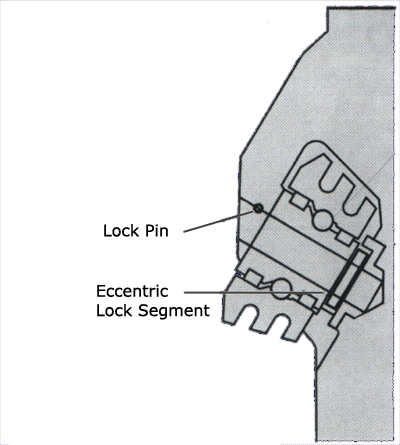
Weldless, rig floor replacement Cutter assemblies are designed to allow fast and convenient redressing on location. No torch cutting or welding is required. Positive, double-safety locking system Cutter assemblies are held securely in place using a proven safely lock pin which retains the cutter pin, and an eccentric-cam locking segment positively locks the inner sleeve of the cutter to the cutter pin. Thus, the sleeve is rigidly locked, but the cutter rotates freely on the ball and roller bearings. Interchangeability Only eight cutter size assemblies are used throughout the 22 body sizes. Thus a given size of cutter may often be used in more than one size of body. For instance, the same three cutters installed in the 1750 body makes 17 1/2, in a 1850 body makes 18 1/2, in a 2000 body makes 20, in a 2100 body makes 21. Installing four of these same cutters (instead of three) in a 2750 body makes 27 1/ 2 and in a 3000 body makes 30, while six cutters in the 3600 body makes a 36 hole. The convenience of reduced spare parts inventory is obvious. Choice of cutters Four cutter designs are available for optimum penetration in soft to hard formations. The Chisel and Conical Button Types are furnished with sealed bearings for the tough jobs. Type S/M and H are furnished with standard bearings unless otherwise specified. These two types are also available in popular sizes with sealed bearings.
|
 |
| CHANGING CUTTER ASSEMBLIES | |
Removing Old Assembly 1. Wash Hole Enlarger thoroughly when removing from the hole. 2. Unlock the eccentric-cam locking segment by turning slightly in the direction of the drill string rotation, using the driving bar and hammer. (See photograph A.) 3. Drive out the lock pin using drift pin and a hammer. (See photograph B.) 4. Screw puller assembly into cutter pin (photograph C). Force cutter pin out with several sharp thrusts of the sliding knocker (photograph D). 5. Slide and/or pry out the used cutter. 6. Inspect circulation jet, bushing, snap ring, and 0-ring. If necessary, replace these parts. 7. Clean body surfaces adjacent to cutter, and cutter pin hole. |
Installing New Assembly1. Set the new cutter assembly in the pocket with the flat in the locking segment toward the bottom end of the body. 2. Adjust the locking segment until the pin holes in the cutter and arm are in alignment. 3. Screw pin assembly wrench into cutter pin and insert to bottom of pocket, rotating slowly until lock pin slot in the cutter pin lines up with the lock pin hole in the cutter arm. 4. Drive in outer lock pin with hammer. Then the inner lock is driven inside the outer lock pin. 5. Unscrew and remove pin assembly wrench. 6. The eccentric-cam locking segment will now be in the “relaxed” position. the cam will automatically lock itself with cutter rotation. Arm Replacement |